 ShopAssist
Set up widget languages and content
Write the widget's customer-facing text and choose where it appears.
Open the client's dashboard from the partner portal, then go to Testing Tool. Ask the merchant which languages the storefront uses and agree on the assistant's name, greeting, and starting questions before you edit.
This page covers the widget's language: what the assistant replies in, and where it appears. A separate setting, the catalog locale, decides which language and country ShopAssist fetches products in. The setup run reads it from the store and applies it when the prompt is published. Contact support if the assistant quotes products or prices from the wrong market.
Choose the language
In Appearance, select the store's fallback Language. For a multilingual store, leave Force this language for all visitors off so the widget follows the storefront language.
Write the customer-facing text
In Content, set the following fields in every language the store offers:
| Field | What shoppers see |
|---|---|
| Modal Title and Modal Subtitle | The name and short description at the top of the open widget |
| Greeting | The opening message |
| Tooltip Text | Text beside the floating button |
| Notification Message | The message inviting shoppers to open the widget |
| Suggestions | Starting questions below the greeting |
Notification Style chooses the appearance of the message beside the button.
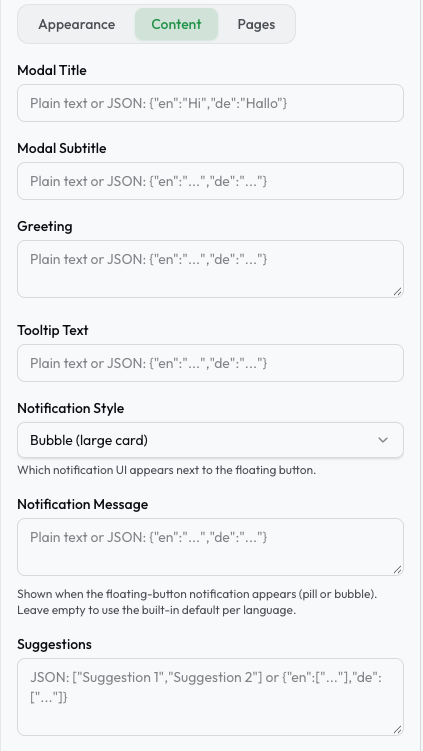
For one language, the text fields accept plain text, while Suggestions takes a JSON list. For multiple languages, use a JSON object with the storefront's locale codes in each field. For example, a greeting:
{ "en": "How can I help you?", "de": "Wie kann ich dir helfen?" }Suggestions uses a list of questions for each language:
{
  "en": ["Show me the bestsellers", "Help me find a gift"],
  "de": ["Zeig mir die Bestseller", "Hilf mir, ein Geschenk zu finden"]
}
Choose three or four questions that reflect what this merchant's customers want to know. Use the same locale codes across the fields, and review the wording with the merchant.
Choose where the widget appears
In Pages, use Enabled Pages, Enabled Locales, and Enabled Countries if the merchant wants to limit where the widget appears. Leave a field empty to allow the widget everywhere for that setting.
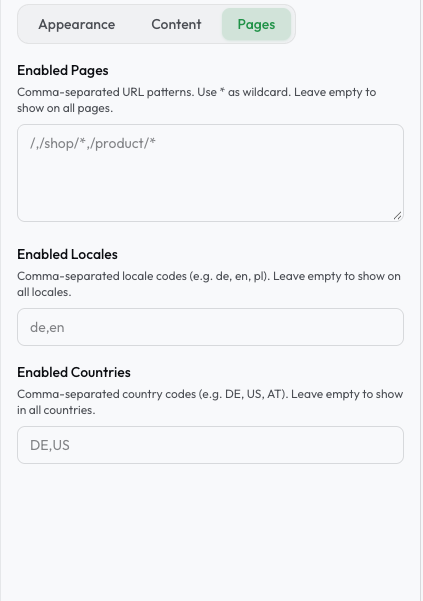
Enabled Locales controls visibility only. It adds no translated text, so every allowed locale also needs content in the Content tab.
Enter comma-separated values. Page paths can use * as a wildcard, for example
/,/shop/*,/product/*. Use locale codes such as de,en and country codes such
as DE,US. Check the store's actual page paths before setting page rules.
Save and check
Select Save settings. Preview every language on desktop and mobile, then check each language on the real storefront. Make sure the text is correct, the suggestions fit, and the widget appears on the pages the merchant chose.
Last updated on