 ShopAssist
Connect a Magento store
Install the ShopAssist module on Magento 2 or Mage-OS and connect a client's store.
The partner portal cannot create Magento shops. Email support@getshopassist.com with the shop domain before you start. ShopAssist creates the shop and assigns it to your agency. You can also connect first, but the client card appears in your portal only after support assigns the shop.
What the module provides
| Component | Description | Placement |
|---|---|---|
| Chat widget | Floating chat button and modal on every storefront page | Automatic, once the shop is live and Show the assistant is Yes |
| Add to cart | Shoppers pick a size or color in the chat and add the product to the normal Magento cart | Automatic |
| Order reporting | Sales that followed a conversation, in the dashboard and on the admin order page | Automatic, after Connect |
| Ask ShopAssist | Question pills on the product page | One setting. See Enhance ShopAssist - Magento |
| Compare | Compare button on the product image and on product cards in listings | One setting. See Enhance ShopAssist - Magento |
The catalog needs no credential. ShopAssist reads it from the store's public
storefront GraphQL API at /graphql, which is the same API the theme uses. The
token that the module creates is for order reporting only.
Grouped and bundle products appear in the chat and link to their product page. Shoppers cannot add them from the chat, because they need the option form on that page.
1. Check the store
| Requirement | Reason |
|---|---|
| Magento 2.4.6 or newer, or Mage-OS | Older versions are not supported |
| PHP 8.1 or newer | The module does not install below this version |
| Command line access to the Magento root | Every Magento module install needs bin/magento |
| An admin user with access to Stores → Configuration | The Connect button is there |
| Reachable from the internet over HTTPS | ShopAssist reads /graphql and /rest/V1/orders |
A store behind HTTP basic authentication, an IP allowlist or a maintenance page fails at step 3, because ShopAssist cannot reach it.
To make sure that the catalog is reachable, run this from any machine:
curl -s https://client-shop.com/graphql \
  -H 'Content-Type: application/json' \
  -d '{"query":"{ storeConfig { locale base_currency_code } products(search: \"\", pageSize: 1) { total_count } }"}'
The response contains the store locale, the currency and a product count. If it returns an error page, fix access before you continue.
2. Install the module
Do the install on a staging copy first if the client has one. The commands change the database schema and recompile the store.
With Composer
Use this route if the store is deployed with Composer, which is the normal case. Run these commands from the Magento root:
composer config repositories.shopassist composer https://cdn.getshopassist.com/magento
composer require shopassist/module-widget
bin/magento module:enable ShopAssist_Widget
bin/magento setup:upgrade
bin/magento setup:di:compile
bin/magento setup:static-content:deploy -f
bin/magento cache:flush
Without Composer
- From the Magento root, download
shopassist-magento.zip
to the server and unpack it into a new module folder. The server needs the
unzipcommand, for example from theunzippackage on Debian or Ubuntu.
curl -fO https://cdn.getshopassist.com/magento/shopassist-magento.zip
mkdir -p app/code/ShopAssist/Widget
unzip shopassist-magento.zip -d app/code/ShopAssist/Widget
rm shopassist-magento.zip- Run the commands from the Composer route, without the two
composerlines.
On a store in developer mode, setup:di:compile and
setup:static-content:deploy are optional.
On a Docker setup, run the same commands inside the PHP container. For example,
with docker-magento you run bin/composer and bin/magento from the project
root, and unpack the archive into src/app/code/ShopAssist/Widget.
In production mode, setup:upgrade puts the store in maintenance mode until the
last command finishes. Run the install in a quiet period.
To make sure that the install worked, run:
bin/magento module:status ShopAssist_WidgetThe output reads Module is enabled. A new ShopAssist tab also appears in
Stores → Configuration.
What the install changes
| Change | Detail |
|---|---|
| Database | Four columns on quote and on sales_order: shopassist_session_id, shopassist_attribution, shopassist_method, shopassist_ai_influenced |
| Integration | An integration named ShopAssist, with read access to sales orders only |
| Storefront | One small inline script on every page. It is the same for every shopper, so full page cache and Varnish keep working |
| Admin order page | A ShopAssist block that shows the attribution for that order |
| Product page | An empty shopassist.questions block. It shows pills only when you switch them on |
| Content Security Policy | widget.getshopassist.com and api.getshopassist.com are allowed, so the widget also works when the store policy is in restrict mode |
3. Connect the store
- In the Magento admin, open Stores → Configuration → ShopAssist → AI Shopping Assistant.
- Set the scope to Default Config. The Connect button is only on that scope.
- Under General → Connection, select Connect to ShopAssist.
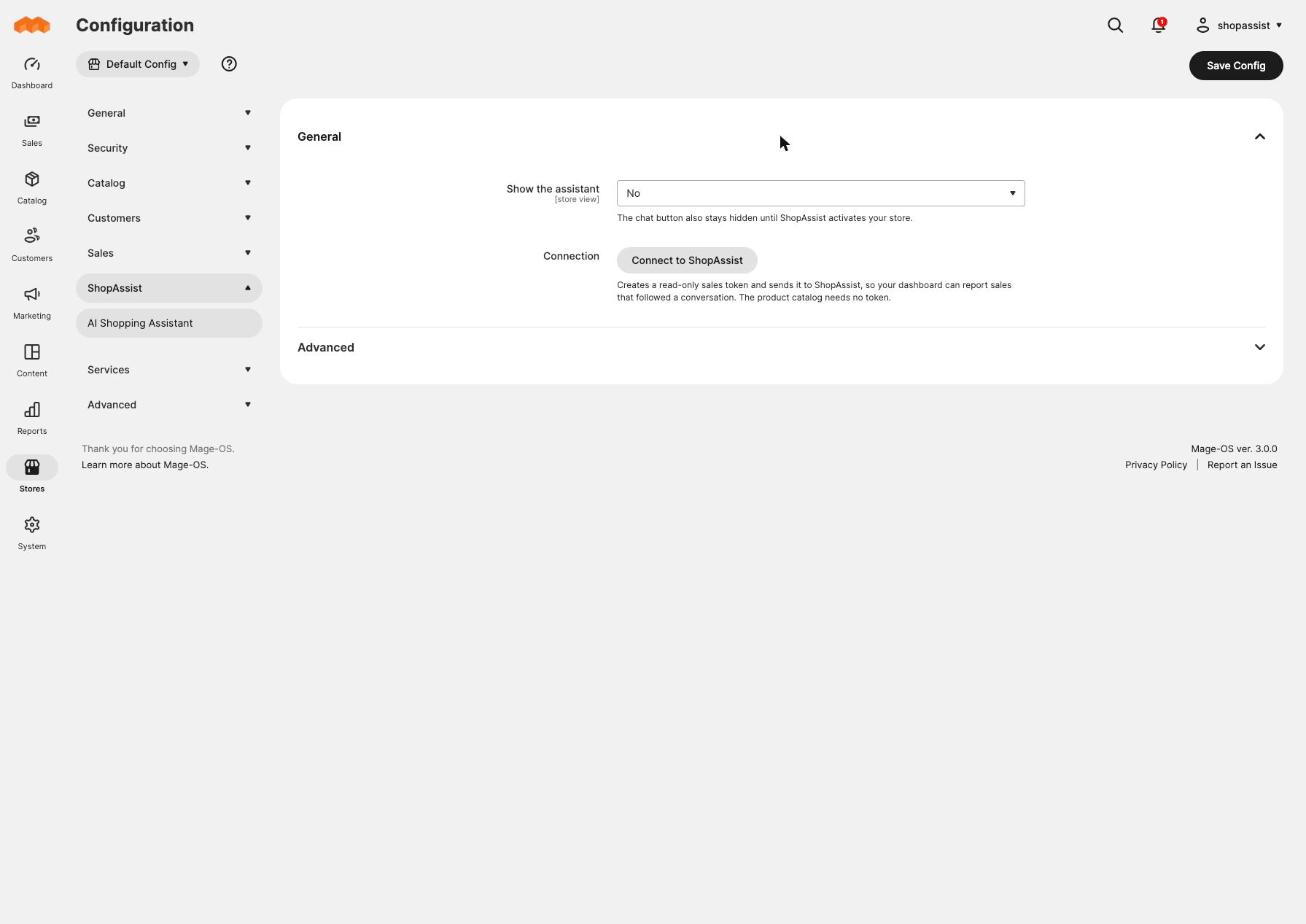
The module activates the ShopAssist integration, issues its token and sends it
to ShopAssist. ShopAssist makes a test request against /rest/V1/orders before
it stores anything. There are no keys to create or copy.
The status line under the button then reads one of these:
| Message | Meaning |
|---|---|
| Connected. ShopAssist activates your store before the chat button appears. | Connected. The shop is still pending |
| ShopAssist did not accept the connection (HTTP 422). | ShopAssist could not read the store's orders. See Troubleshooting |
| Could not reach ShopAssist. Try again. | The store server cannot make outbound HTTPS requests |
The client card in the portal then reads Connected.
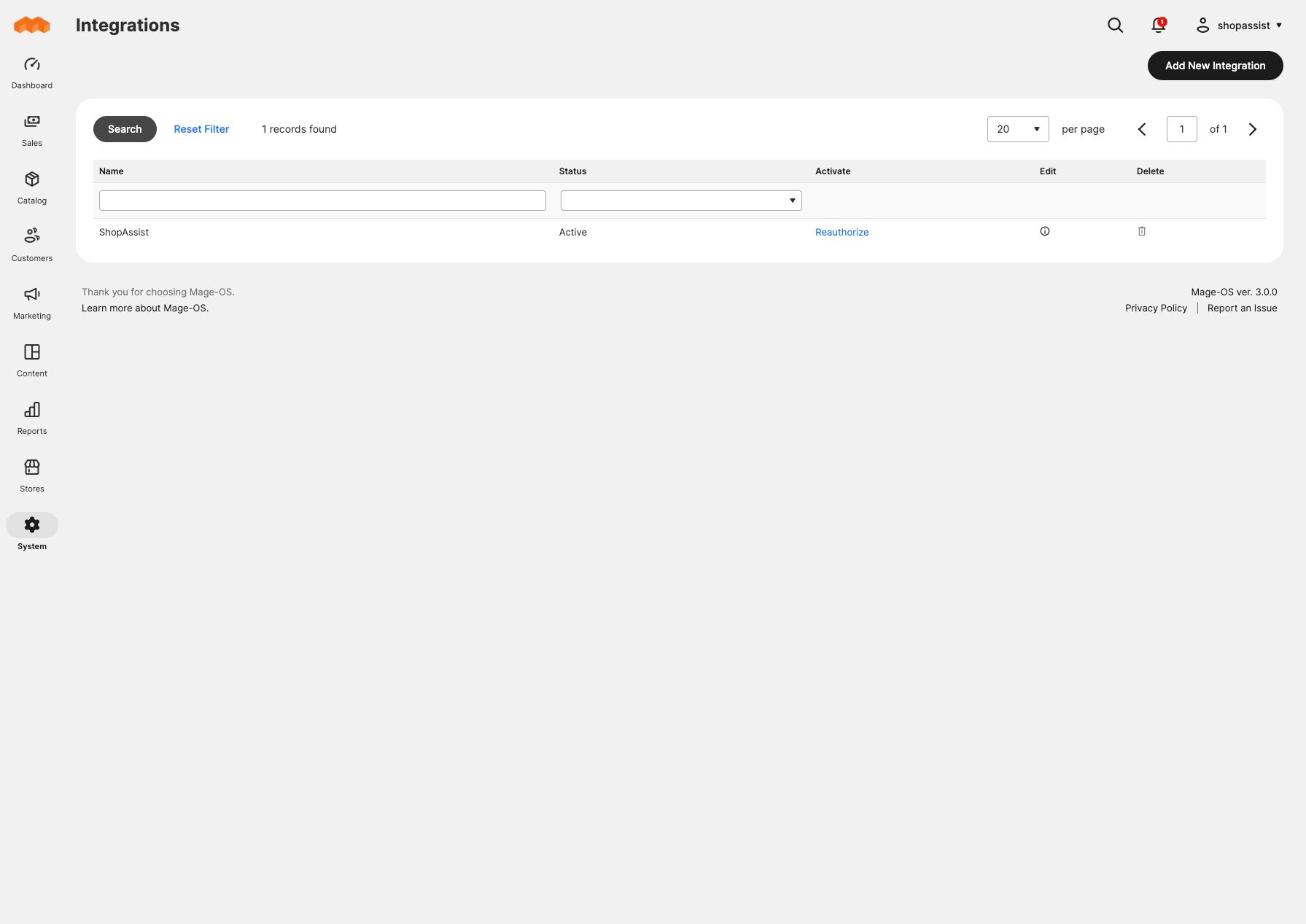
You can see the integration in System → Extensions → Integrations, with the status Active. Its API tab lists the sales resources and nothing else.
4. Switch the widget on
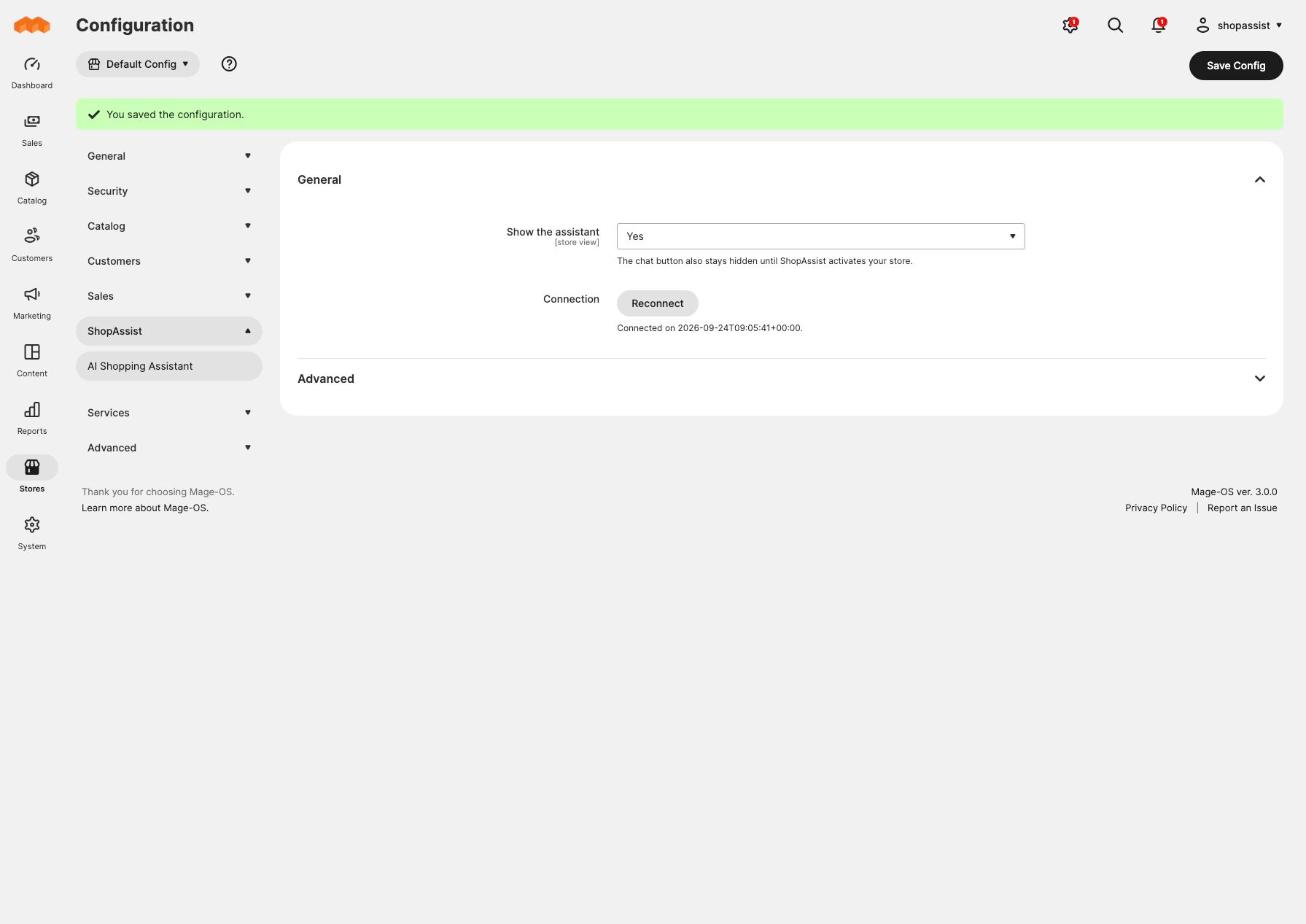
- On the same configuration page, set Show the assistant to Yes.
- Select Save Config.
- Open System → Cache Management. Select Configuration and Page Cache, which Magento marks Invalidated, set the action to Refresh, and select Submit.
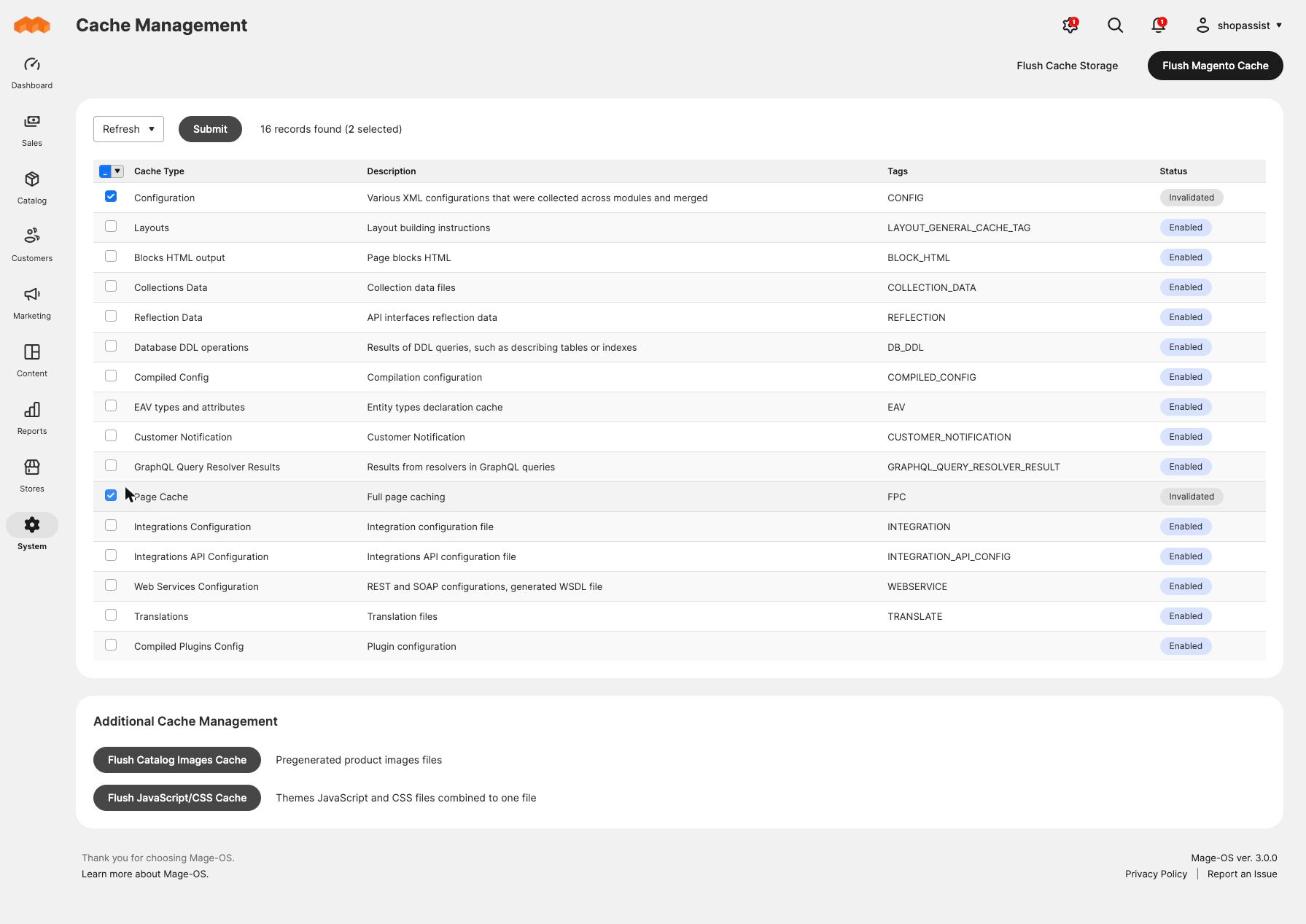
The refresh puts the widget on pages that the full page cache already holds.
The switch works per website and per store view, so you can limit the widget to one store view.
The chat button stays hidden until the shop is live, even with the switch on. After go-live, the button appears on its own.
The module reads the currency, the language (general/locale/code), the default
country and the product URL suffix (Catalog → Catalog → Search Engine
Optimization) from Magento.
The two fields under Advanced point the module at ShopAssist. Keep their default values.
5. Catalog settings
Magento catalogs are variant-heavy. A configurable product becomes one entry per child product, so 180 products can become 1,880 entries. ShopAssist support sets the catalog mode for Magento shops. Tell support the product count when you request the shop.
| Catalog size | Setting that support applies |
|---|---|
| Up to about 500 products | Full catalog, each product listed once with a size and color picker |
| More than about 500 products | Search index. The first index build starts at publish |
The onboarding run in the portal also recommends the mode, and publishing a run that chose the search index switches the shop over.
Check the store
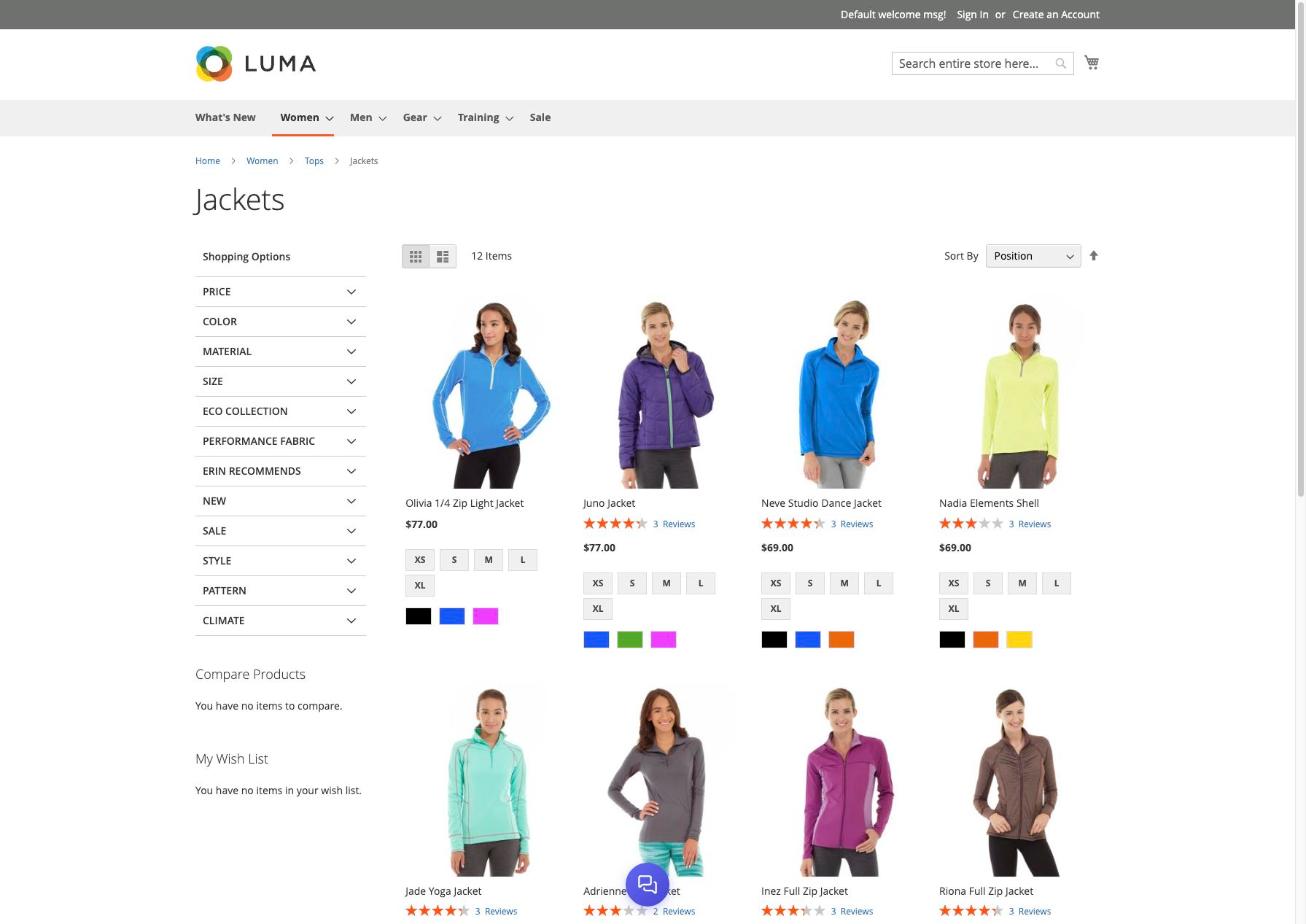
When the shop is live, load a product page on the storefront.
- A floating chat button appears at the bottom of the page.
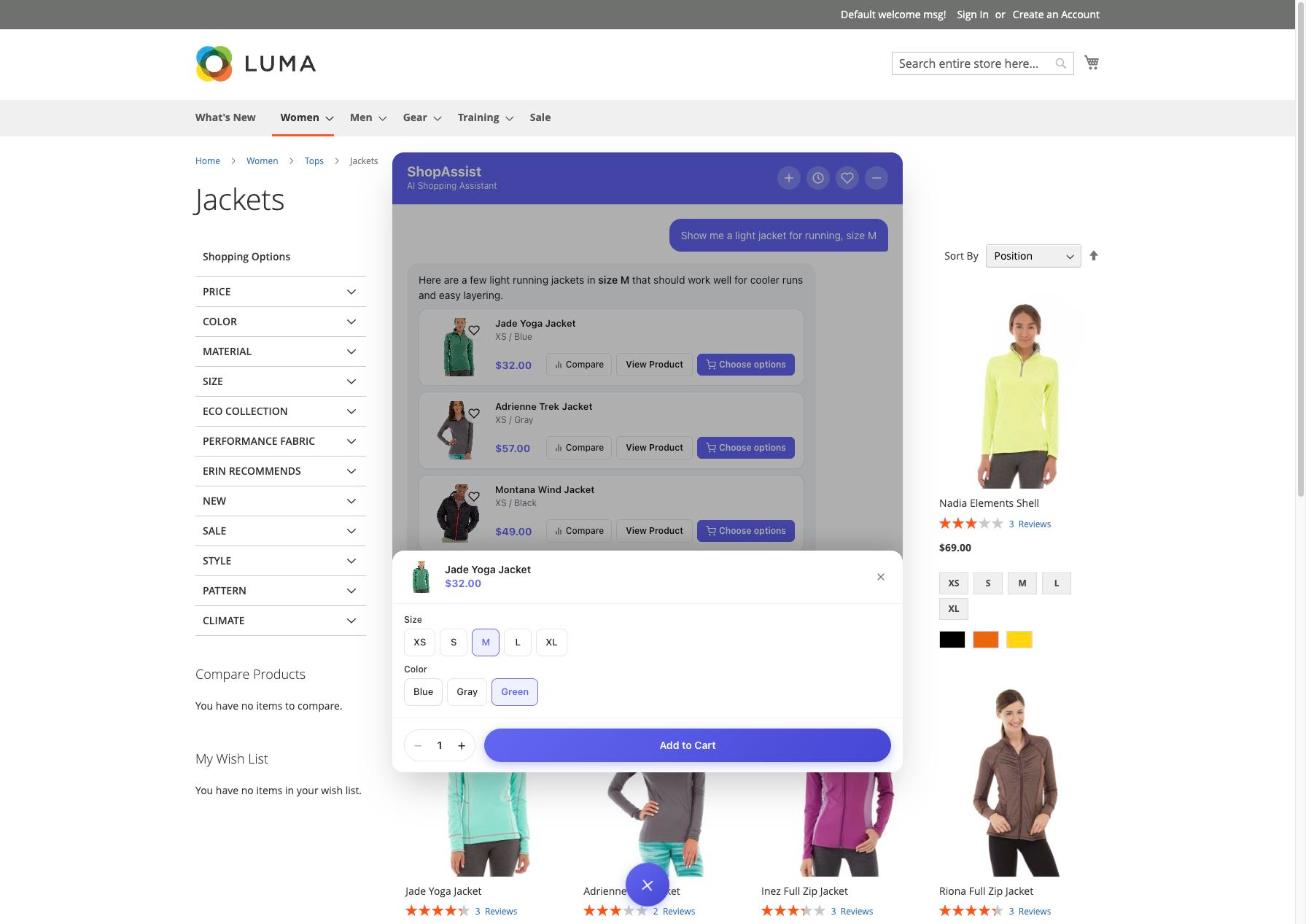
- Ask for a product. The answer shows product cards.
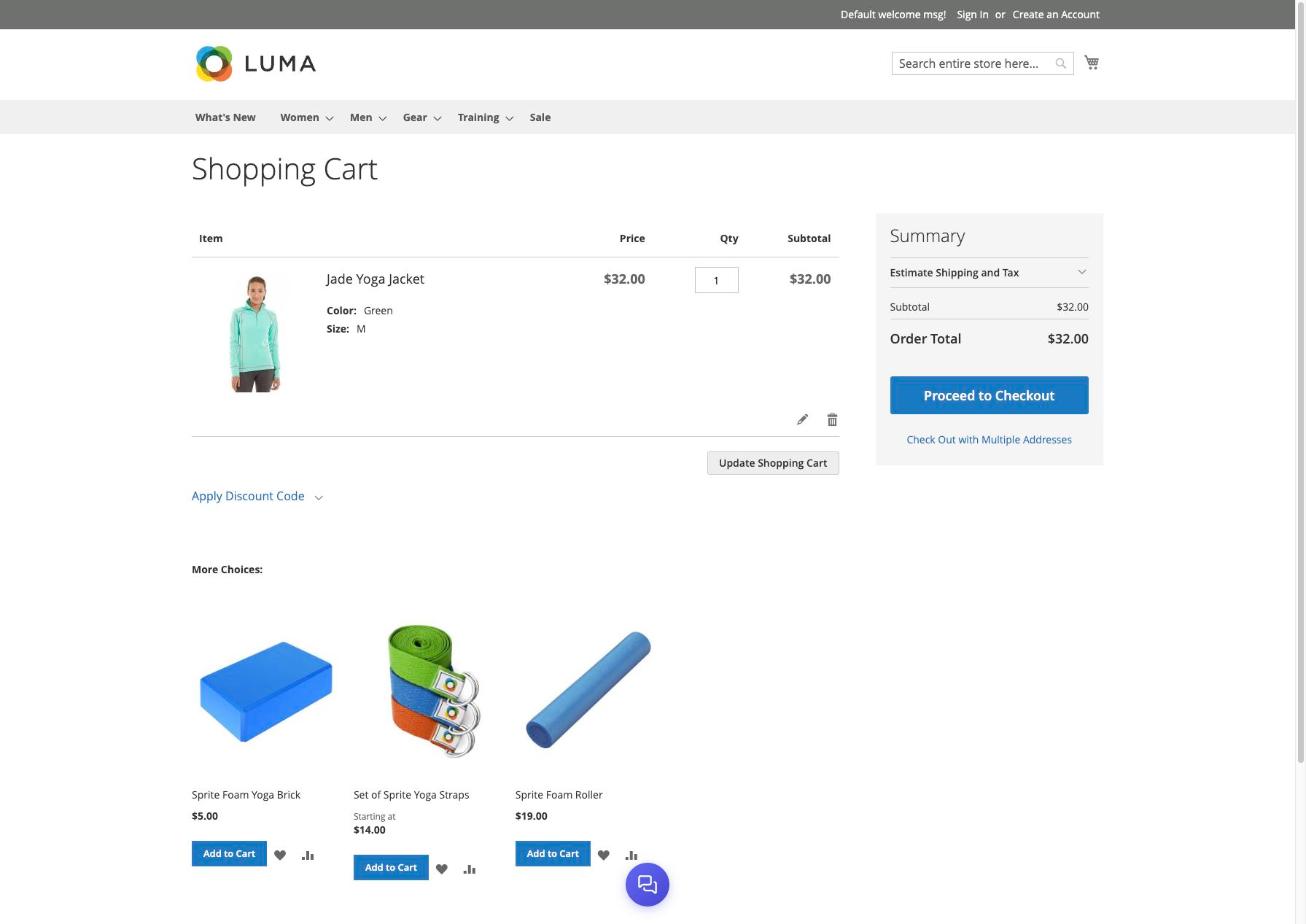
- Select Choose options on a card, pick a size and a color, and select Add to Cart. The item is in the Magento cart with those options.
- Place a test order after a chat. The admin order page shows the ShopAssist block, and the order appears in the dashboard after the next order sync.
To see the widget status without a browser, run:
curl -H "X-Shop-Domain: client-shop.com" \
  https://api.getshopassist.com/api/widget/settings
"pluginEnabled": true means that the shop is live. Shop not registered means
that step 3 did not complete.
Stores that cannot install the module
Some hosted stores do not allow a custom module. Those stores can still run ShopAssist, with two limits: there is no per-order attribution, and you paste the widget script by hand.
Order reporting without the module
- Open System → Extensions → Integrations and select Add New Integration.
- Set Name to
ShopAssistand Email to your agency address. - Set these two URLs:
| Field | Value |
|---|---|
| Callback URL | https://api.getshopassist.com/api/magento/oauth/callback |
| Identity link URL | https://api.getshopassist.com/api/magento/oauth/identity |
- On the API tab, set Resource Access to Custom and select Sales → Operations → Orders → Actions → View only.
- Select Save, then Activate next to the integration, then Allow.
Magento sends the credentials to ShopAssist directly. If the activation window shows an error, ShopAssist did not store the credentials. Repeat the activation.
Widget without the module
Open Content → Design → Configuration, edit the store view, and paste this block into HTML Head → Scripts and Style Sheets:
<script>
  window.ShopAssistConfig = {
    shopDomain: "client-shop.com",
    platform: "magento",
    apiUrl: "https://api.getshopassist.com",
    magento: {
      currency: "EUR",
      language: "de",
      country: "DE",
      urlSuffix: ".html",
      cartUrl: "/checkout/cart/",
      checkoutUrl: "/checkout/",
    },
  };
</script>
<script src="https://widget.getshopassist.com/shop-assist.js" defer></script>
Set shopDomain to the domain that support registered. Set currency, language, country and urlSuffix to
the store view values. If a store view has a different language or currency,
paste a separate block for that store view.
Uninstall
bin/magento module:disable ShopAssist_Widget
composer remove shopassist/module-widget   # or: rm -rf app/code/ShopAssist/Widget
bin/magento setup:upgrade
bin/magento setup:di:compile
bin/magento setup:static-content:deploy -f
bin/magento cache:flush
The chat button goes away. The ShopAssist account, settings and past
conversations stay. To pause the widget instead, set Show the assistant to
No. To stop order reporting, delete the ShopAssist integration.
Troubleshooting
| Symptom | Cause | Resolution |
|---|---|---|
| No ShopAssist tab in Stores → Configuration | The module is not enabled, or the cache is stale | Run bin/magento module:status ShopAssist_Widget, then bin/magento cache:flush |
| No Connect button | The scope is a website or a store view | Switch the scope to Default Config |
| HTTP 422 on connect | ShopAssist cannot read /rest/V1/orders on the store | Make the store reachable over HTTPS and remove IP or basic auth limits on /rest |
| "Could not reach ShopAssist" | The server blocks outbound HTTPS to api.getshopassist.com | Allow outbound HTTPS from the web server |
| Card stays on created after connect | The connect used a different domain than the one support registered | Send support both domains |
| Connected, but no chat button | The shop is not live, or Show the assistant is No for that store view | Take the shop live, then check the switch per store view |
| Chat button shows, but no products | /graphql is blocked or the store view has no products | Run the curl check in step 1 |
| Mini cart does not update after an add | The theme does not load Magento_Customer/js/customer-data, for example Hyvä | The item is in the cart and shows after a page reload. Send support the theme name |
For anything else, email support@getshopassist.com with the shop domain, the Magento version, the step reached, and the message shown under the Connect button.
Next
Build and ship the assistant. The remaining work is the same as on every other platform. When the shop is live, add the question pills and Compare with Enhance ShopAssist - Magento.
Last updated on