 ShopAssist
Connect a nopCommerce store
Install the ShopAssist plugin on nopCommerce and connect a client's store.
Add the client in the partner portal before you start, with the platform set to nopCommerce. Connecting requires an administrator login for the store's nopCommerce admin.
If the client installs the plugin themselves, send them the merchant guide at widget.getshopassist.com/nopcommerce.
What the plugin provides
| Component | Description | Placement |
|---|---|---|
| Chat widget | Floating chat button and modal, site-wide | Automatic, once the shop is live |
| Add to cart | Shoppers pick the product's options in the chat and add it to the nopCommerce cart | Automatic |
| Order reporting | Orders that followed a conversation, with their revenue, in the dashboard | Automatic, after Connect |
| Ask ShopAssist | AI-generated question pills on the product page | Automatic for products with questions. See Enhance ShopAssist - nopCommerce |
| Compare | Compare button on the product image and on product cards | Once support switches Compare on. See Enhance ShopAssist - nopCommerce |
nopCommerce has no public catalog API, so the plugin serves two read-only feeds
on the store's own domain, /shopassist/products and /shopassist/orders. They
answer only requests that carry the plugin's feed key, which Connect sends to
ShopAssist. The order feed carries totals, items and status, and no customer
name, email or address. When a shopper places an order, the plugin copies the chat
session onto it, which is how the dashboard knows which sales came from a
conversation.
1. Check the store
| Requirement | Reason |
|---|---|
| nopCommerce 4.00 | The plugin's supported version. Email support for any other version |
Reachable from the internet over HTTPS, including /shopassist/* | ShopAssist reads the catalog and orders there |
Outbound HTTPS from the web server to api.getshopassist.com | Connect sends the key there |
| The public address in Configuration → Stores → Store URL | Connect sends that address, and ShopAssist reads the feeds from it |
A theme with the standard product cards (.product-item) | Compare reads the product cards in listings |
A test store behind a VPN or an IP allowlist cannot be connected, because ShopAssist cannot reach its feeds.
2. Install the plugin
Work in the client's nopCommerce admin. Each restart takes the store offline for a minute or two, so plan the install outside busy hours.
- Download shopassist-nopcommerce.zip. The client card in the portal has the same link under Download plugin.
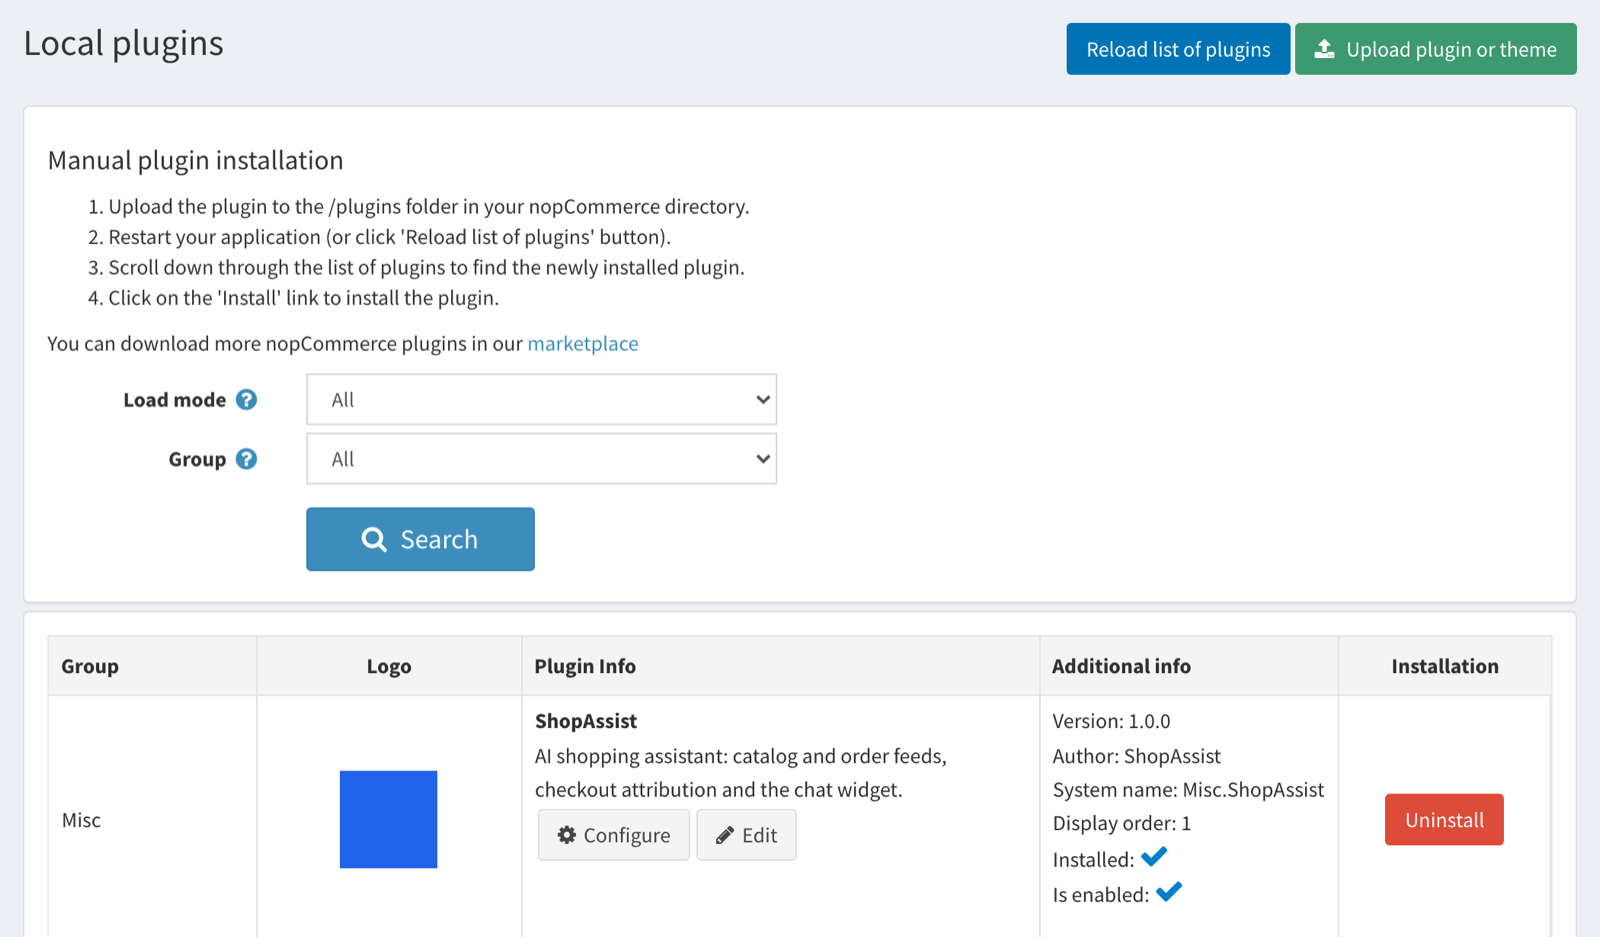
- Open Configuration → Plugins → Local plugins and select Upload plugin or theme. Choose the zip file and upload it.
- Select Restart application. nopCommerce 4.00 lists an uploaded plugin only after a restart.
- Find ShopAssist in the Misc group and select Install.
- Select Restart application again.
The ShopAssist row shows Installed and Is enabled, with a Configure button.
3. Connect the store
- Select Configure on the ShopAssist row.
- Check Currency and Country. The install fills them from the store's
primary currency and default language, for example
EURandSI. - Select Connect to ShopAssist.
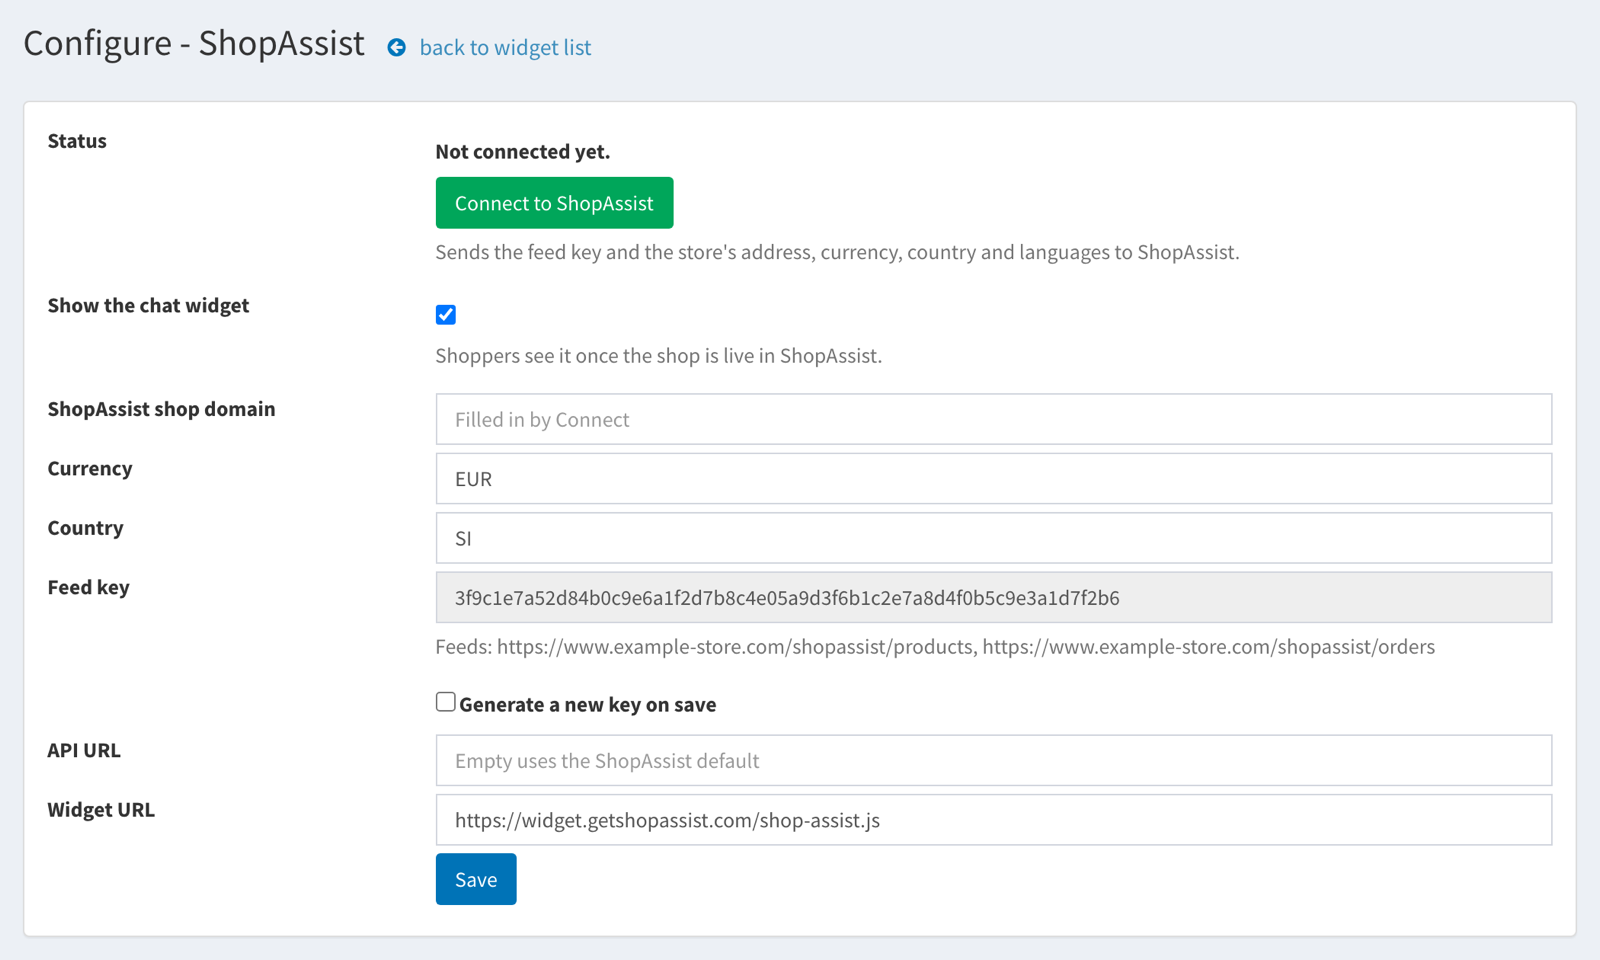
The plugin sends the feed key with the store's address, currency, country and languages. ShopAssist reads one product from the feed with the key, then stores it on the client you added. The plugin fills ShopAssist shop domain, a green message confirms the connection, and the client card in the portal reads Connected.
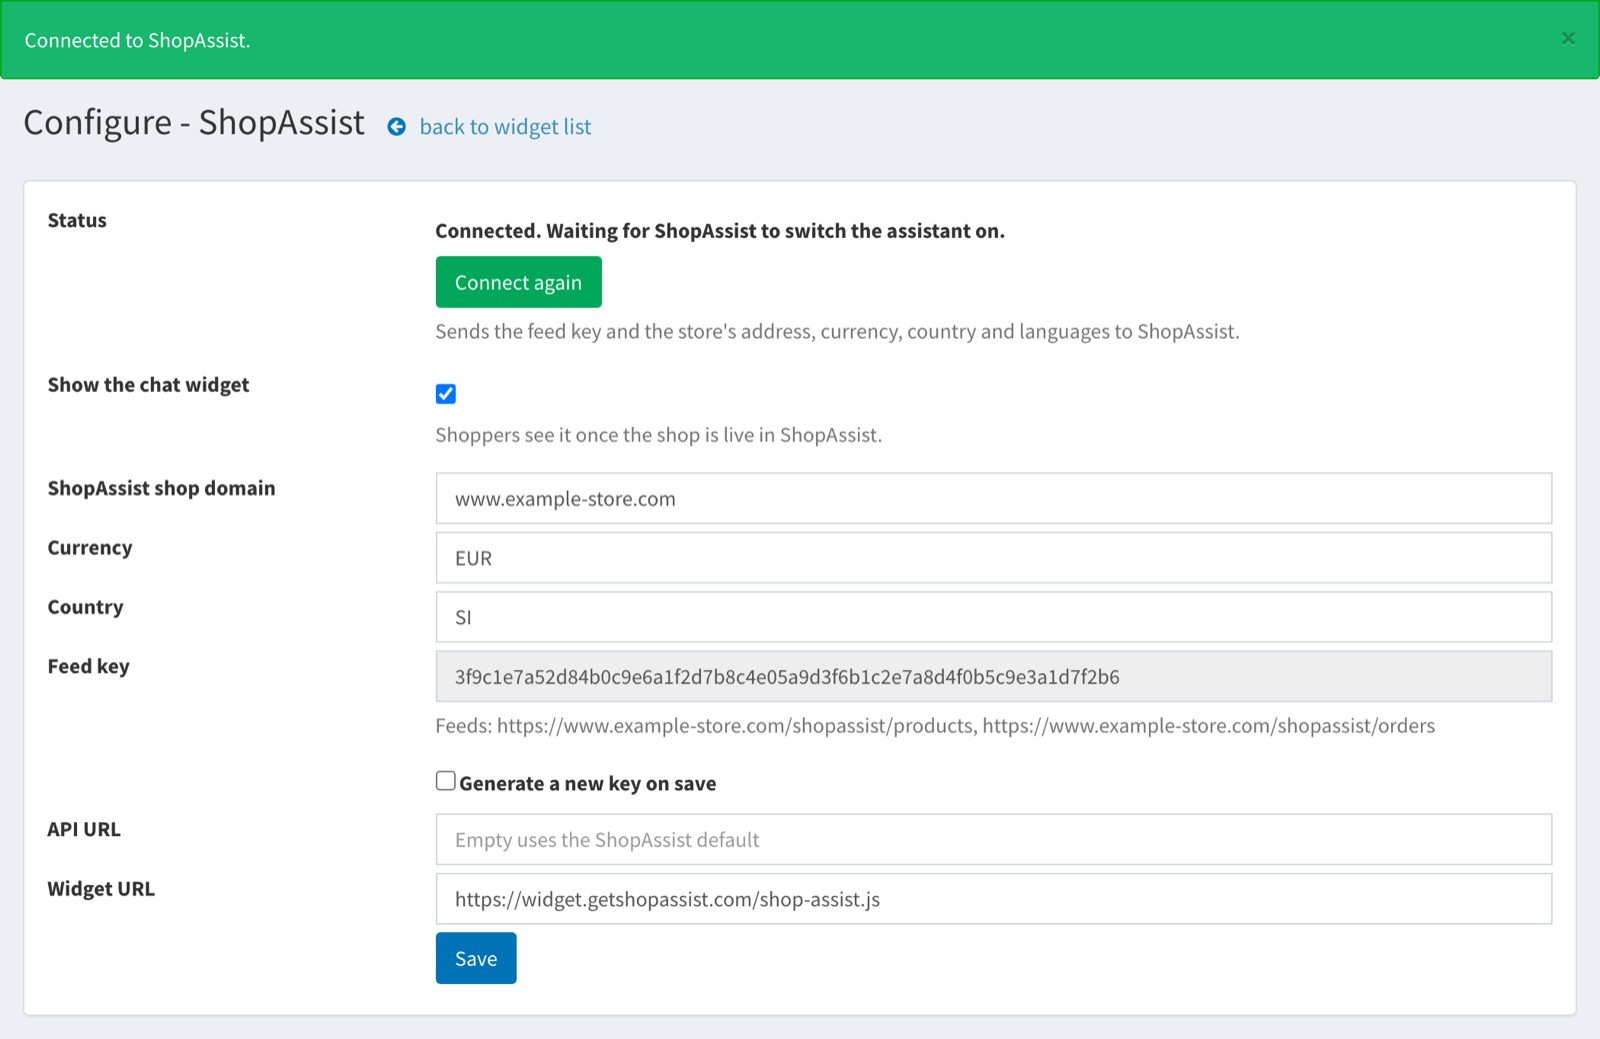
Selecting Connect again later sends the current key and settings again.
Status line
The top of the ShopAssist configuration page reflects the shop in ShopAssist.
| Status line | Portal stage | Next step |
|---|---|---|
| Not connected yet. | Created | Step 3 |
| Connected. Waiting for ShopAssist to switch the assistant on. | Connected or Testing | Build and ship the assistant, then Go live |
| Connected and live. | Live | Check the storefront |
Plugin settings
| Setting | Effect | After install |
|---|---|---|
| Show the chat widget | Shows or hides the whole assistant, including the question pills and Compare | Ticked |
| ShopAssist shop domain | The shop the widget loads. Connect fills it | Empty |
| Currency | The store's currency code | The primary store currency |
| Country | The store's country. With the page language, it selects the catalog the chat reads | From the default language, for example sl-SI gives SI |
| Feed key | The key the feeds require | Generated |
| Generate a new key on save | Replaces the key. Select Connect again afterwards, because the feeds refuse the old key | Unticked |
| API URL, Widget URL | Point the plugin at ShopAssist. Empty uses the ShopAssist defaults | Defaults |
The plugin reads the language from each storefront page, so a store with several languages works with one install. Connect sends every store language, and the catalog is read in each of them.
Check the store
Once the shop is live:
- Open the storefront in a private window. A round chat button sits at the bottom of the page.
- Ask for a product. The answer shows product cards with the store's prices, including VAT and discounts.
- Select Add to cart on a card. The cart counter in the header goes up, and the flyout cart lists the item.
- Place a test order from that cart. It appears in the client dashboard as an AI-attributed order after the next order sync.
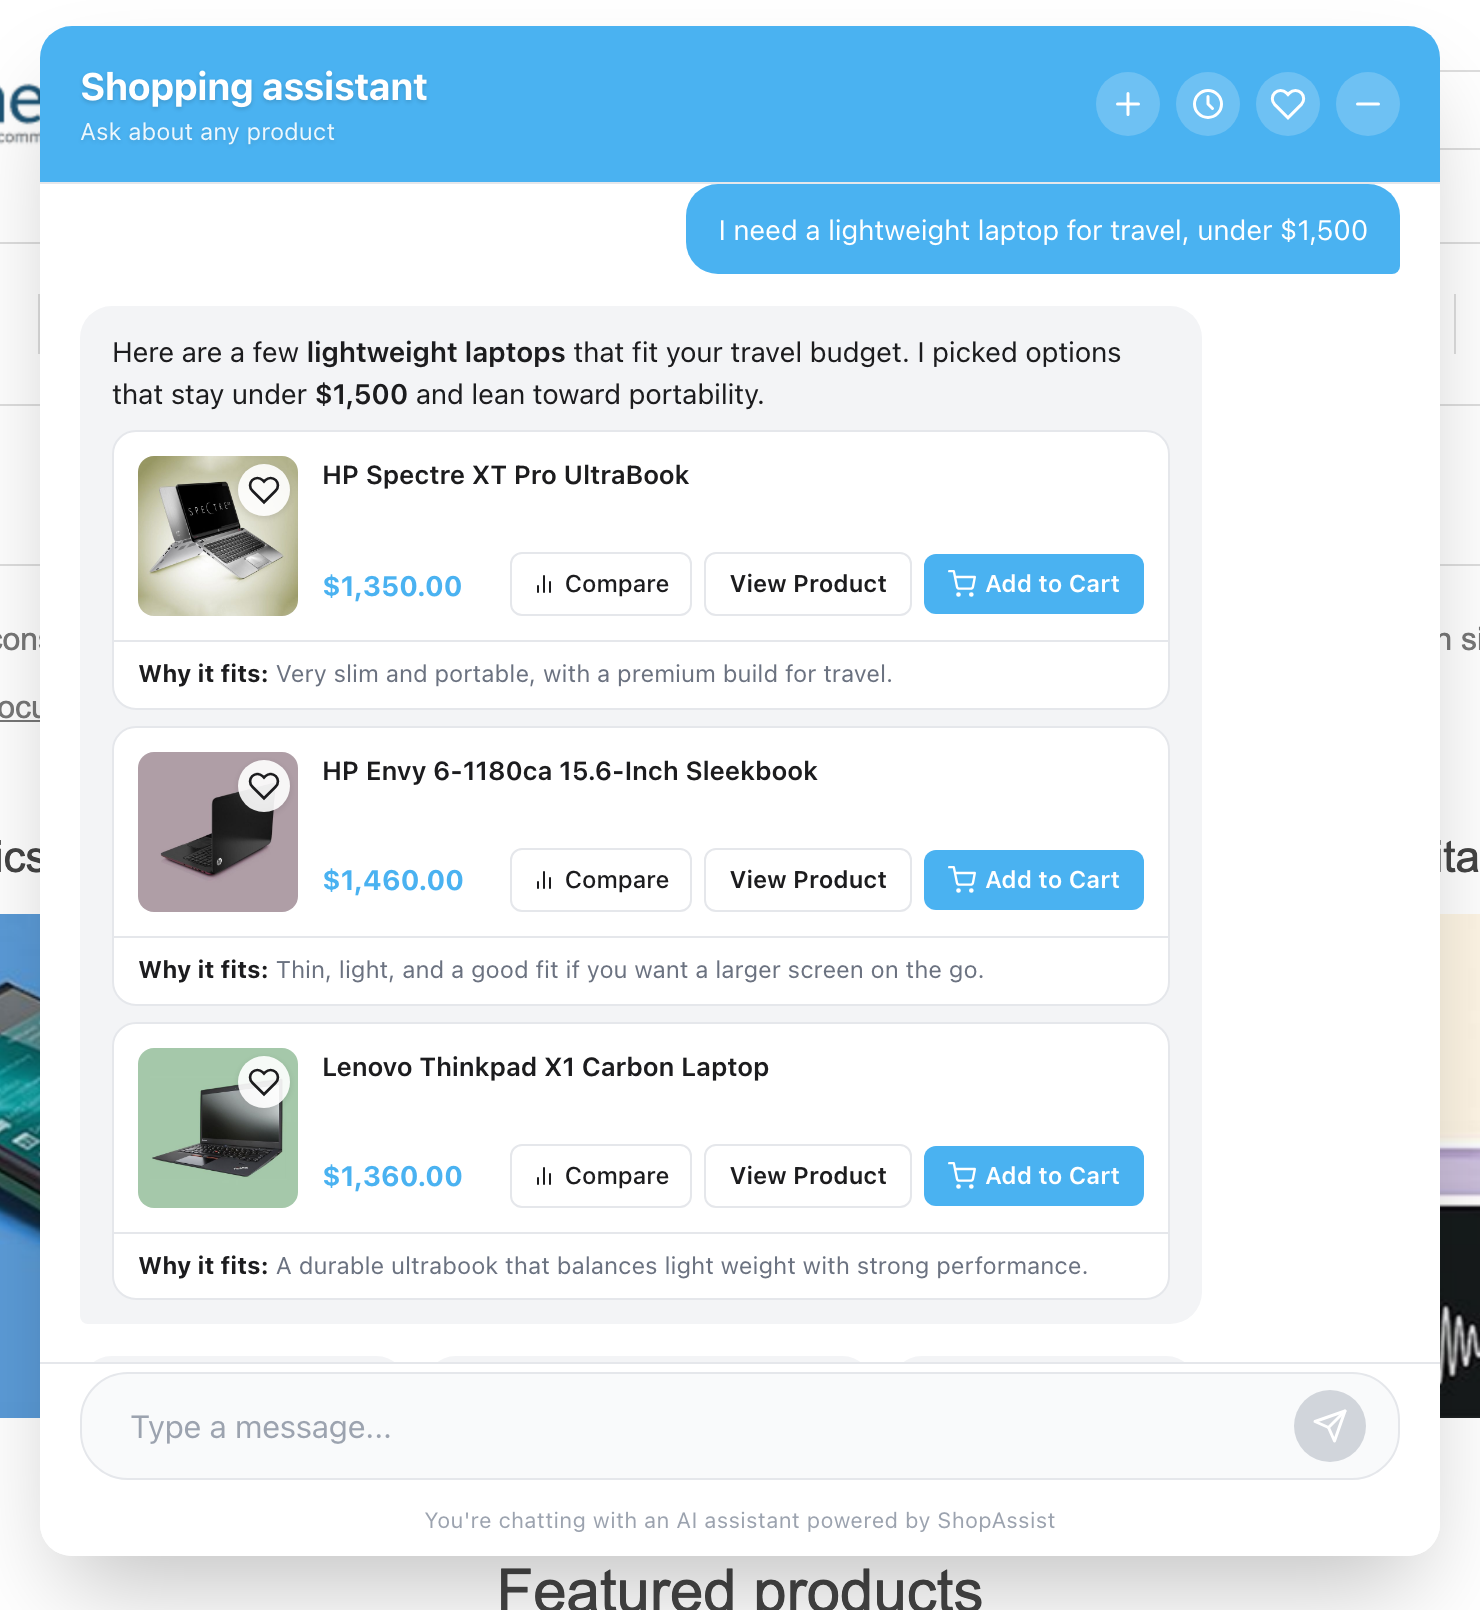
A product with a required option that the chat does not carry, such as a text field, opens its product page instead, where the shopper completes the form.
To read the widget status from the command line, run:
curl -H "X-Shop-Domain: client-shop.com" \
  https://api.getshopassist.com/api/widget/settings
"pluginEnabled": true means that the shop is live.
Uninstall
Open Configuration → Plugins → Local plugins, select Uninstall on the ShopAssist row, then Restart application. The chat button goes away, the feeds stop answering, and the plugin deletes its settings. The client, its settings, its conversations and the orders already synced stay in ShopAssist.
A reinstall generates a new feed key, so select Connect to ShopAssist again. To pause the widget instead, untick Show the chat widget.
Troubleshooting
| Symptom | Cause | Resolution |
|---|---|---|
| ShopAssist is missing from the plugin list after the upload | The application has not restarted | Select Restart application |
| "ShopAssist could not read your catalog feed at …" | The store URL is not the public address, or the plugin is installed but the application has not restarted | Set Configuration → Stores → Store URL to the public https:// address, restart, then select Connect to ShopAssist again |
| "ShopAssist could not reach your store at …" | A firewall, VPN, IP allowlist or basic authentication sits in front of the store | Open /shopassist/* over HTTPS to ShopAssist, then connect again |
| "Your bot protection blocked ShopAssist." | A bot service in front of the store refused ShopAssist | Email support with the name of the service |
| "This domain is already registered with ShopAssist on another platform." | The domain was registered as another platform, for example before a migration | Email support with the domain |
| "ShopAssist is unreachable right now." | The server blocks outbound HTTPS | Allow outbound HTTPS to api.getshopassist.com |
| Client card stays on Created after Connect | The domain in the portal differs from the store URL, for example a staging domain | Email support with both domains |
| Connected, but no chat button | The shop is waiting for go-live, or Show the chat widget is unticked | Take the shop live, then check the setting |
| Orders sync, none attributed | The orders were placed before the plugin was installed | Place a new test order from a chat |
For anything else, email support@getshopassist.com with the shop domain, the nopCommerce version, the theme, the step reached, and the message on the ShopAssist configuration page.
Next
Build and ship the assistant. The remaining work is the same on every platform. Once the shop is live, set up the question pills and Compare with Enhance ShopAssist - nopCommerce.
Last updated on